Slash Your Returns: 6 Tech Design Strategies
Time to read: 13.5 minutes
In 2017, U.S. return delivery costs amounted to 381 billion U.S. dollars and are expected to reach 550 billion U.S. dollars by 2020. The executive director for the Reverse Logistics Association says, "Returns to physical stores average about 8 percent; the rate is almost three times higher for items ordered online." Online sales of clothing are seeing an even higher rate of returns, closer to 40%!
But brands aren't always on the losing end of the returns deal. For some retailers, a great customer service reputation is worth the sunk cost. In an email, Nordstrom told Racked: "It's about creating a relationship with [the customer] for the long term, and that commitment doesn't change with the seasons.”
Retailers who don’t offer an easy returns process are losing sales and customer loyalty, with 84% of shoppers saying they won’t come back to a brand if they have a poor returns experience.
So if you don’t want to tighten up your return policy, how can you reduce returns? To answer that… let’s take a look at the reasons why people are actually making returns.
Reason 1: Defects
Return Magic attributes non-preference-based reasons (e.g., defective and “not as described") as accounting for 10% of total returns.
Defects are probably the worst of all reasons to have a product returned. Your customer won’t have just felt ddisappointed;you’ve probably damaged their trust in you too.
Making sure you have an end product that actually works is best attributed to having proper development and production processes in place.
The product development process
Start with a test version of your design idea. Try out the prototype in the wild. Test it. Make a minimum viable version. Does it work? Does it fit?
Document your design. Compile all materials, specifications, dimensions, and sketches in 1 place. Even better, get a tech pack. Make sure there is a single document that contains all your product’s information.
Make any necessary improvements to your design. How can you tweak this to make it better? Or cheaper? Or use less fabric? Or easier to use? Now is the time to make improvements before you start production. Use your documentation from step 2 to track any changes to the design. Not only should your product work, it should be reliable and a pleasure to use.
After production sample approval, you can move into production. Every time a production run is complete, a percentage of that needs to be checked over. Use your original documentation to make sure this production run has been made to spec.
Rinse and repeat. Keep referring back to the specs in the tech pack to keep you on track.
This simple process allows you to spot any defects before it’s too late. There’s nothing clever about these steps; it’s super simple. When you do spot a defect (and you will), manufacturing is not easy… you now have a simple accountability tool and can quickly fix the issue.
Either the defect identifies that your factory has not been following the product documentation… or the defect will highlight that there is a problem with the information in your specs. In which case you will need to go back to step 2. Easily see where problems are popping up and fix them at the source before a defect gets into the hands of a customer.
Tolerances
A tolerance is a given allowance for deviation from the standard. The tolerance is a range above and below your measurements that you will also find acceptable. So for example, if your given sleeve length is 20 cm and your tolerance for sleeve length is +/- 0.5 cm… that means you will also accept sleeve lengths between 19.5 and 20.5 cm.
The advantage of this is twofold. Firstly, it allows you to draw a line and let your production know that a sleeve length of 19 or 21 is unacceptable. Secondly, you are allowing for a fractional margin of error that is negligible for you. But for your factory… it will allow them to produce with increased speed and accuracy. The more efficient they can be, the better for your margins.
All the measurements in your tech pack should have tolerances. That goes for the measurements in your specification sheet for the various sizes of your product. Usually, longer measurements have bigger tolerances. A shorter measurement would obviously have a smaller tolerance. Fabric weights can also be given a tolerance of +/- 10 grams per square meter.

Reason 2: Quality Didn’t Meet Expectations
Consumers returning faulty items have more than doubled between 2017 and 2019 (12% to 26%) and nearly quadrupled for items in cases where the quality didn’t meet expectations (from 6% to 22%).
How do you prevent this gap between expectation and actual product? Better product photos would definitely be an easy way to do this. But let’s dig one level deeper. When you pick a product in your hands, what is the first thing you notice? It’s how the product feels in your hand. If the fabric feels thick or thin, cheap or expensive, flimsy or luxurious.
This is what’s known as hand-feel. Hand-feel is something that is difficult to quantify or describe on paper. Two of the same fabrics, with the same composition and the same thickness… can have different hand feels. Cotton jersey at $1 per meter from one supplier might not have the same hand feel as cotton jersey from a second supplier at $3 a meter.
Fabrics
It can really pay off to do your own fabric research. Go to specialist shops, do competitor research, and collect a variety of samples. Get to know the various fabric options that would work for your product. When you’ve found a suitable quality fabric you like, send a swatch to your supplier. See if they can source this themselves or if they can send you to someone who might have it.
If you leave the creative decisions to a supplier, they aren’t likely to dedicate much time to research unless you’re paying for their time. Of course they don’t have as much invested in your product as you. If you invest some time into research, it can really pay off in the end.
Ultimately, your fabric choices can affect not just the hand feel but also the drape or structure of your product. The quality of your fabric too is important. It dictates how long the product will last and how it stands up to daily wearing and washing.
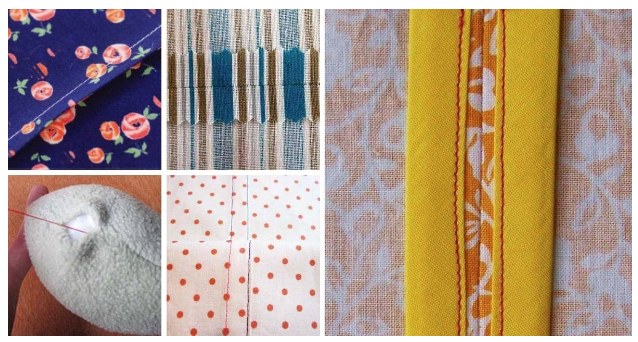
Trims
A trim is anything that is stitched onto a garment or accessory. It could be functional or decorative. Often where quality issues arise is with the trims. The fall-off, or they stop functioning!
My first tip here would be to source components from brand-name suppliers. Companies like YKK, Riri, or Coats have a reputation for quality. Their products, like zippers, buttons, rivets, and threads, will have been tested and certified.
Reason 3: Fit
Consumer preference-based return reasons (e.g., size, fit, style, etc.) tend to drive around 72% of all returns in fashion product categories.
Top reasons for returns were:
Size too small: 30%
Size too large: 22%
That’s a whopping 52% of returns all for the same reason… fit! Luckily this is a problem that has a couple of fixes, although not easy ones. Two different strategies come to mind that can immediately fix this. First is using a size chart.
Size Charts
Do you have a size chart for your brand? Retailers spend big money getting and analyzing data on their customers. Their body measurements were included.
Even if you don’t have the resources to do that, you can always send a simple questionnaire about sizing to your audience. Remember that it’s always better to start using a size chart today so that all new styles in the future are following the same body measurements. Doesn’t matter as much if these measurements are generic… consistency is better than inconsistency. You can always make adjustments later when you have more information.
You can send this size chart to your technical designer and pattern cutter. They will use this to create your design’s dimensions. You want to make sure your fit is consistent, always! Link to this size chart on your product page, along with some information on the measurements of the actual product as well. Arm the customer with as much information as you can to give them an idea of whether the item will fit.
Fittings
Are you testing the fit of your garments in real life on an actual person? The industry standard way to do this would be to hire a fit model. This is somebody who has the *exact* body measurements as in your size chart.
Once you have the product on a fit model, you can see how nicely the item fits and lies on the body. Watch out for any areas of tension where the fabric is pulling. This means the area is too tight.
Apart from any obvious issues where the garment is too loose, too tight, too long, or too short. You can also watch how the style moves with the body. Does bending over, reaching the arms up, or just moving and waking in general highlight any more issues?
The second consideration in getting a good fit is your fabric. It’s quite common to see a slight change in your fabric if you have been developing or producing a style for a while. The % of stretch might change with a new supplier. A new dye lot may affect the thickness and therefore drape of a fabric. Always, always test your design out in a new fabric. If there is any reason for there to be a slight change in your fabric, you have an excuse to do another fit test.


Author Bio
Tech Packs Co founder Belinda is a technical fashion designer from London, now based in Los Angeles. Belinda had her first job in fashion at the age of 15, fixing swatch cards together. Since then, Belinda has been designing & creating tech packs for more than a decade... for household name brands and independent designers alike.