The Ultimate Guide to Garment Stitches: What to Use and When
Time to read: 7 minutes

If you’re developing apparel, understanding stitch types isn’t optional; it directly impacts durability, stretch, seam strength, and overall product quality. Many production issues come from using the wrong stitch for the job. This guide breaks down the most common stitch types used in apparel manufacturing, when to use them, and how they affect performance and cost.
Why Stitch Selection Matters
Stitches determine:
Seam strength
Seam flexibility
Stretch recovery
Durability after washing
Garment appearance
Production efficiency
Seam quality is typically measured by
Seam depth, length, and width
Seam slippage strength
Overall seam strength
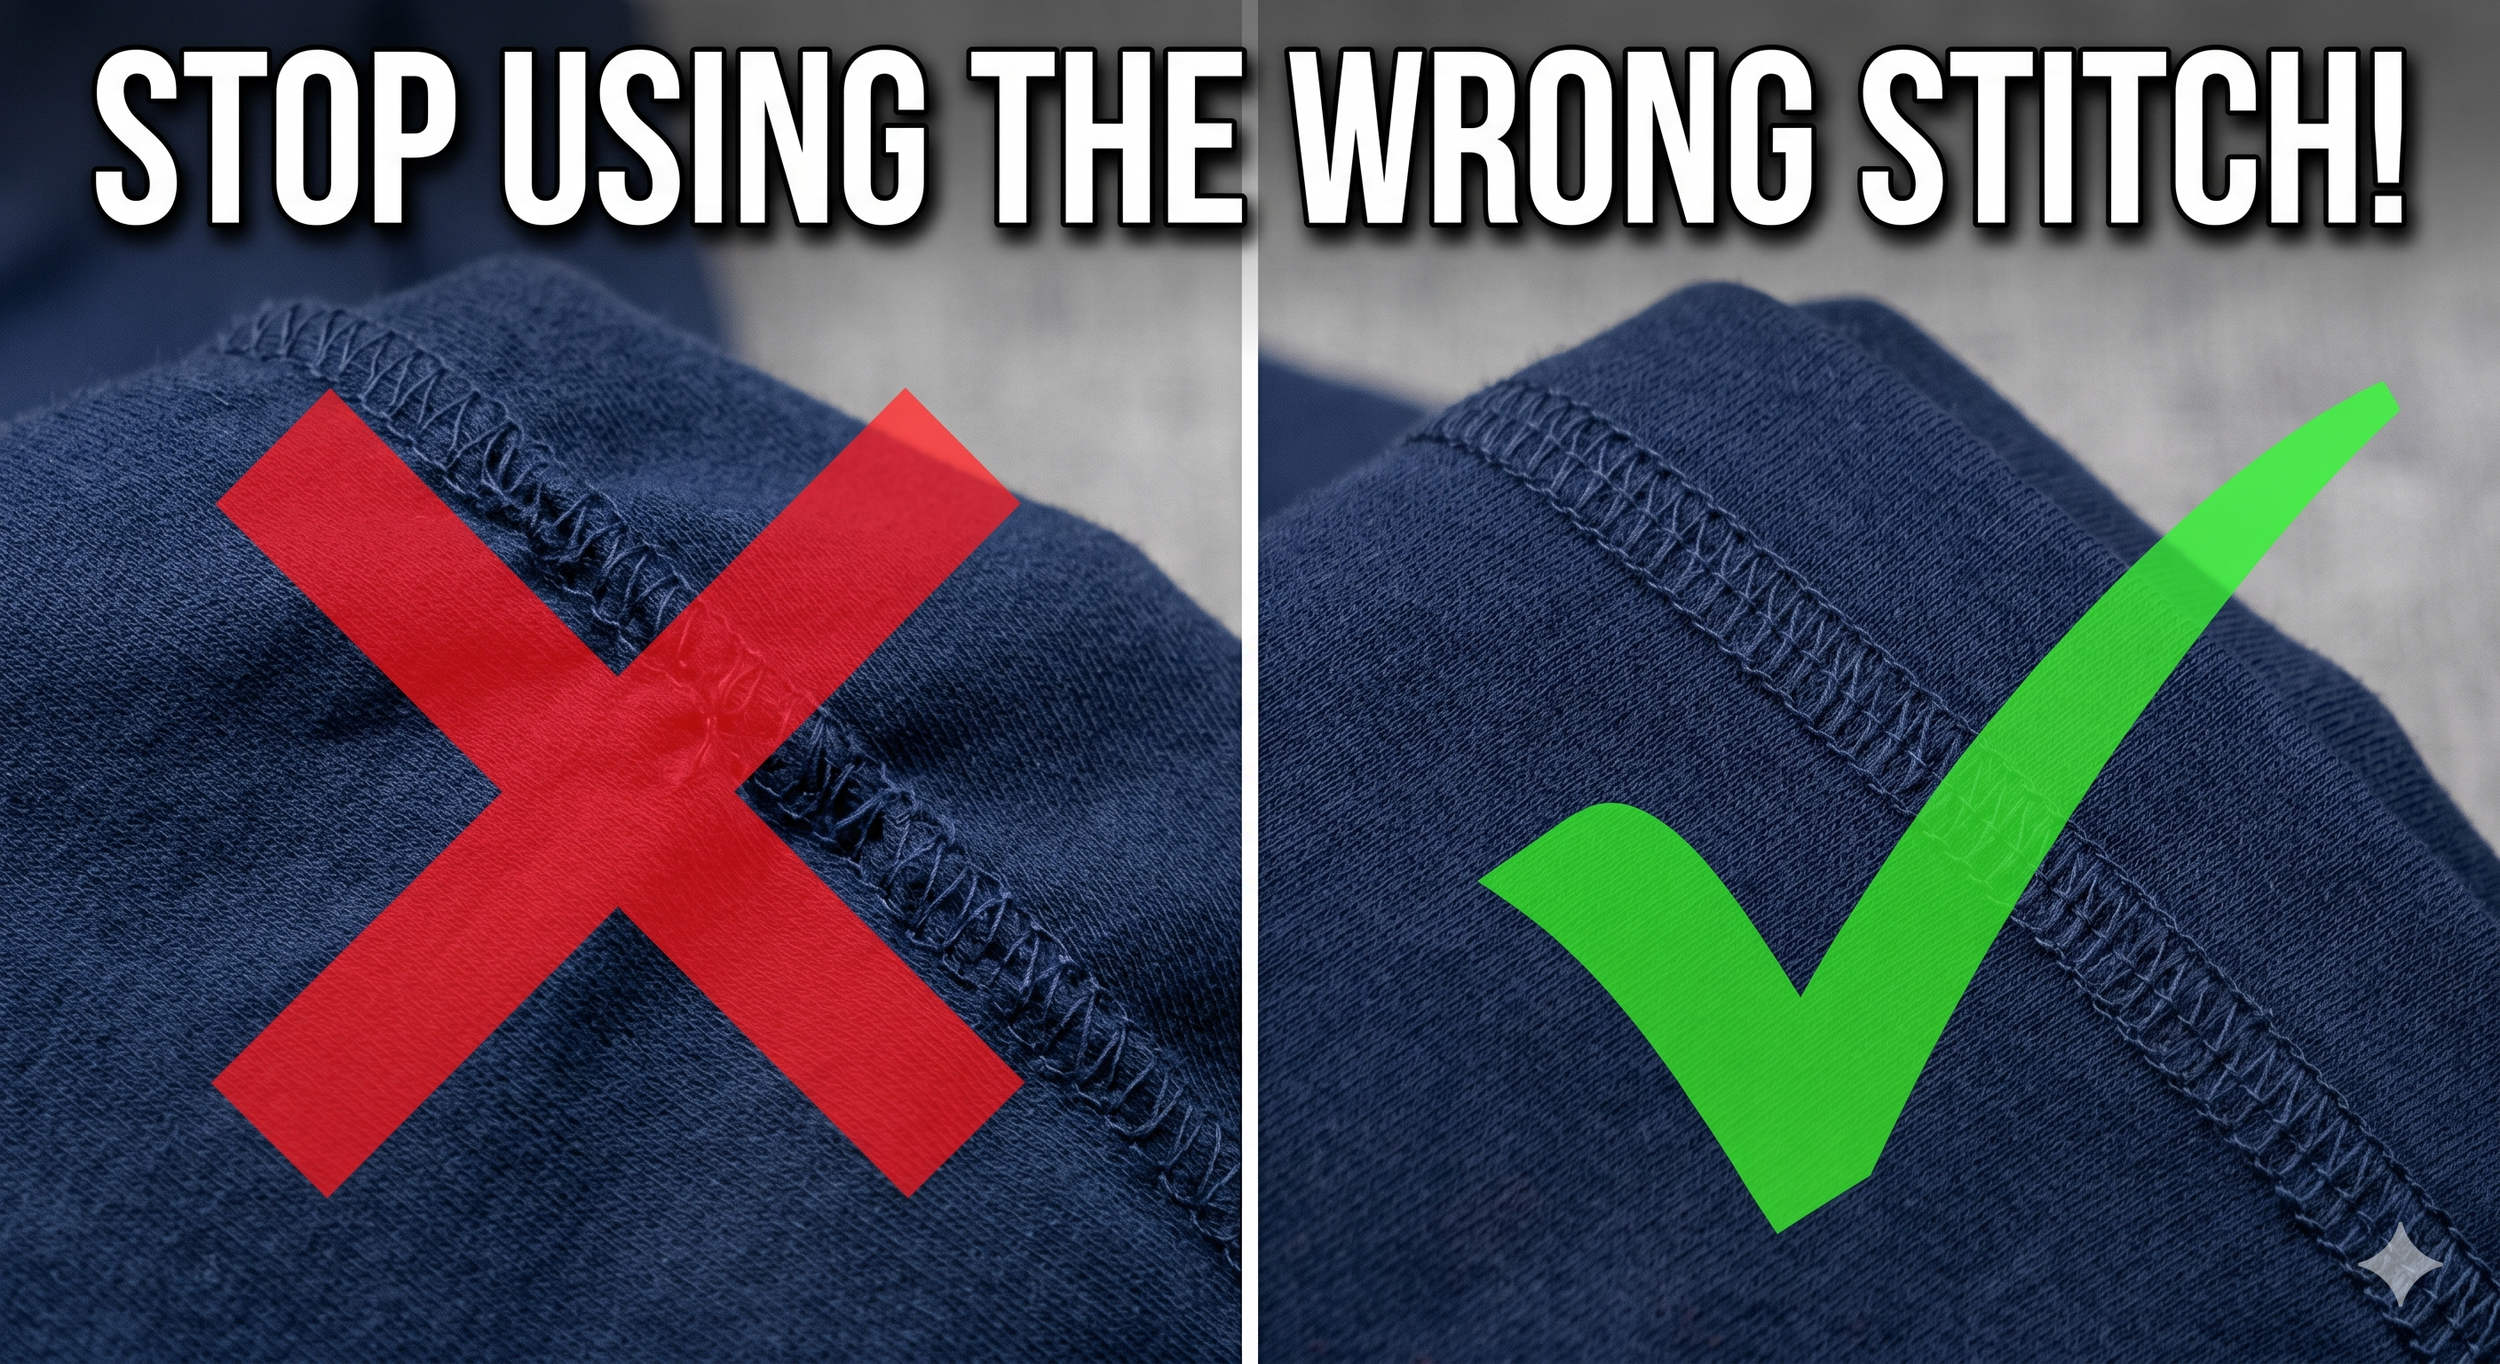
Choosing the wrong stitch can lead to popped seams, poor recovery, or garments that fail testing. On the other end of the spectrum, choosing an unnecessarily visible or thread-heavy stitch can complicate sewing and hike up thread costs.
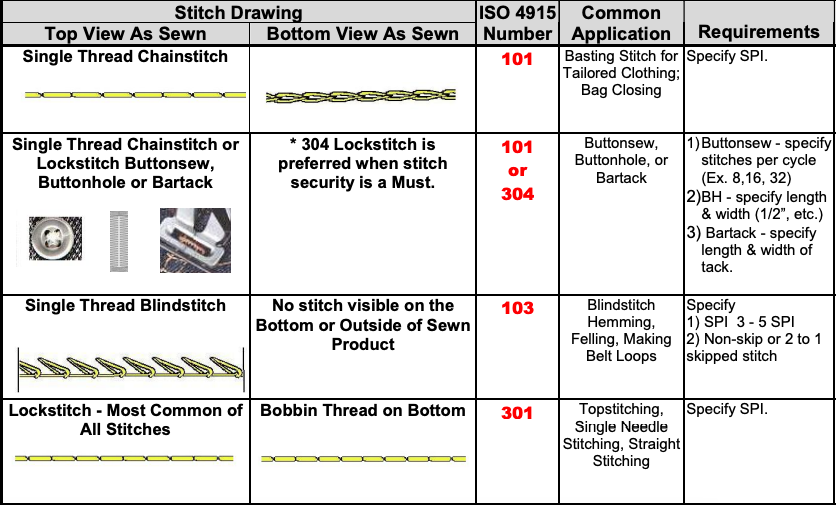
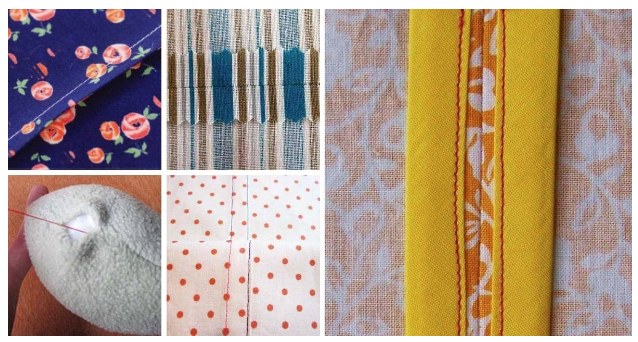
1. Lockstitch (ISO 301)
Best for: Structured garments, topstitching, straight seams.
The lockstitch is one of the most common stitches in apparel manufacturing.
How it works: A needle thread passes through the fabric and interlocks with a bobbin thread in the center of the seam. The stitch looks the same on the top and bottom.
Common uses: Topstitching, woven garments, shirts, trousers, and structured seams.
Why use it: Provides a clean appearance, strong seam, and professional finish.
Important: Always specify stitches per inch (SPI) in your tech pack.
2. Chainstitch (ISO 101 & 401)
Best for: Flexible seams, decorative seaming, denim.
ISO 101 – Single Thread Chainstitch
Often used for: basting, temporary stitching, and tailored garments.
How it works: Forms by interlooping with itself on the underside.
ISO 401 – Two-Thread Chainstitch
Used for: Side seams, decorative stitching, and denim inseams.
Why use chainstitch: It is more flexible than a lockstitch, allows stretch, and creates a distinctive seam look (highly common in denim).
3. Overedge/Overlock/Serging (ISO 504)
Also known as: Serging, Merrowing, Overedging.
Best for: Finishing raw edges and preventing fraying.
How it works: Formed by one needle thread and two looper threads that create a purl edge around the seam.
Thread variations: 2-thread, 3-thread, 4-thread, 5-thread.
Common uses: Knit garments, t-shirts, athletic wear, and interior edge finishing.
Why use it: Prevents fraying, provides a clean edge finish, and remains flexible for knits.
4. Safety Stitch (ISO 516)
Best for: High-stress seams in apparel.
5-Thread Safety Stitch (516)
Combines: a single-needle chainstitch (401) and a 3-thread overedge (504).
Common uses: Seaming wovens, seaming knits, and heavy production apparel.
Why use it: Creates an extremely strong seam with a clean finish. The 5-thread version is ideal for commercial, mass manufacturing due to its durability.
5. Coverstitch (ISO 406 & 602)
Best for: Hems on knit garments and activewear. If you're producing sportswear, a coverstitch is essential.
2 Needle Bottom Coverstitch (406)
Used for: Pocket facings, denim, and structured knit applications.
2 Needle 4 Thread Coverstitch (602)
Used for: T-shirt hems, activewear, binding, and infant clothing.
Why use it: Allows high stretch, provides a professional finish, and creates a clean, twin-needle appearance on the outside.
6. Blind Stitch (ISO 103 & 503)
Best for: Invisible hems.
Blind Stitch (103)
How it works: Interloops on the top surface while barely catching the fabric underneath.
Blindhem (ISO 503 formation)
Common uses: Dress hems, formal wear, tailored garments, and decorative applications.
7. Zig Zag Stitch (ISO 304 & ISO 404 Chain Version)
Best for: Stretch seams and reinforcement. The zigzag pattern allows seam flexibility and expansion.
Applications: Elastic attachment, highly stretchable fabrics, and decorative finishes.
8. Decorative Stitch Types
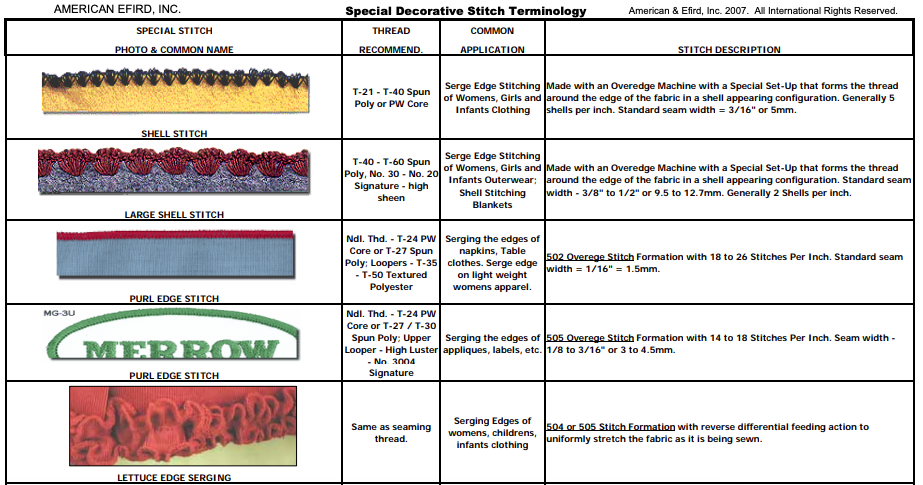
These stitches are used purely to add aesthetic value to the garment.
Shell Stitch / Large Shell Stitch (Merrow)
Best for: Decorative edging
Used on:
Women’s garments
Infant clothing
Blankets
Appliqués
Creates a scalloped shell effect on edges.
Lettuce Edge Serging
Best for: Feminine or ruffled finishes
Created by stretching fabric using reverse differential feed.
Common in:
Knit dresses
Children’s garments
Sweaters
Picoetta Stitch / 2 Needle Fagoting (ISO 411)
Best for: Decorative seam joining
Used to join two finished edges with a visible decorative space between them.
Pin, Pick, or Saddle Stitch (ISO 108 or ISO 201)
Best for: Decorative topstitching on tailored garments
Used on:
Coats
Jackets
Dresses
Adds luxury aesthetic detail.
How to Choose and Document the Right Stitch
Before handing anything off to a manufacturer, you have to determine the exact functional requirements of your garment. When evaluating a seam, ask yourself the following:
Purpose: Is this seam structural or purely decorative? Is ultimate durability or appearance the priority?
Elasticity: Does the fabric stretch, and if so, how much?
Tension: Will the seam and stitch experience high stress? Is it weight-bearing?
Visibility: Does the stitch need to be completely invisible from the outside?
Once you have the answers to these questions, you must document them. Many brands mistakenly assume that their factories will simply "know what to use" when it comes to construction, but leaving those decisions up to chance is a massive risk. Your tech pack must explicitly translate your design needs by specifying the exact ISO stitch number, the required Stitches Per Inch (SPI), the specific thread type, seam width, and precise stitch placement. Providing this level of clear, technical specification is the only way to prevent weak seams, inconsistent interior finishes, and frustrating disputes during production.
Conclusion
Stitches are far more than just minor technical details; they fundamentally define how your garment performs, stretches, and survives daily wear. By strategically choosing the correct stitch, you dramatically improve a product's durability, reduce costly customer returns, and fiercely protect your brand's reputation for quality. Furthermore, specifying the proper stitch construction directly supports your factory in meeting rigorous compliance and physical testing standards. Ultimately, the exact stitch you call out in your tech pack is the difference between a garment that lasts for years and one that fails after its first wash.
Choosing the correct stitch type isn’t just a technical decision; it directly impacts garment durability, stretch performance, seam strength, production cost, and overall quality.
At Tech Packs Co, we help fashion brands clearly specify stitch types, seam constructions, SPI, thread types, and ISO stitch codes inside professional tech packs so factories execute your designs exactly as intended.
Whether you’re developing activewear that requires 4-thread safety stitches, denim with precise twin-needle lockstitching, or knitwear with coverstitch hems, we make sure every construction detail is documented for smooth production.
Avoid costly sampling errors and production delays. Book a consultation with us today and ensure your next collection is built with the right stitch strategy from day one.


Author Bio
Tech Packs Co founder Belinda is a technical fashion designer from London, now based in Los Angeles. Belinda had her first job in fashion at the age of 15, fixing swatch cards together. Since then, Belinda has been designing & creating tech packs for more than a decade... for household name brands and independent designers alike.